


Settings and Features I use on my Sony A95L TV

Many devices come with settings that aren’t the best, so we need to configure them. I made the following changes:
‣ I used a surge protector. It has three output sockets, and I use only one so, that the surge protector is hopefully more effective.
‣ Unplug the Bravia Cam1. It doesn’t do anything worthwhile to offset the privacy risk.
‣ In Bravia Notifications, set Display Featured notifications: off.
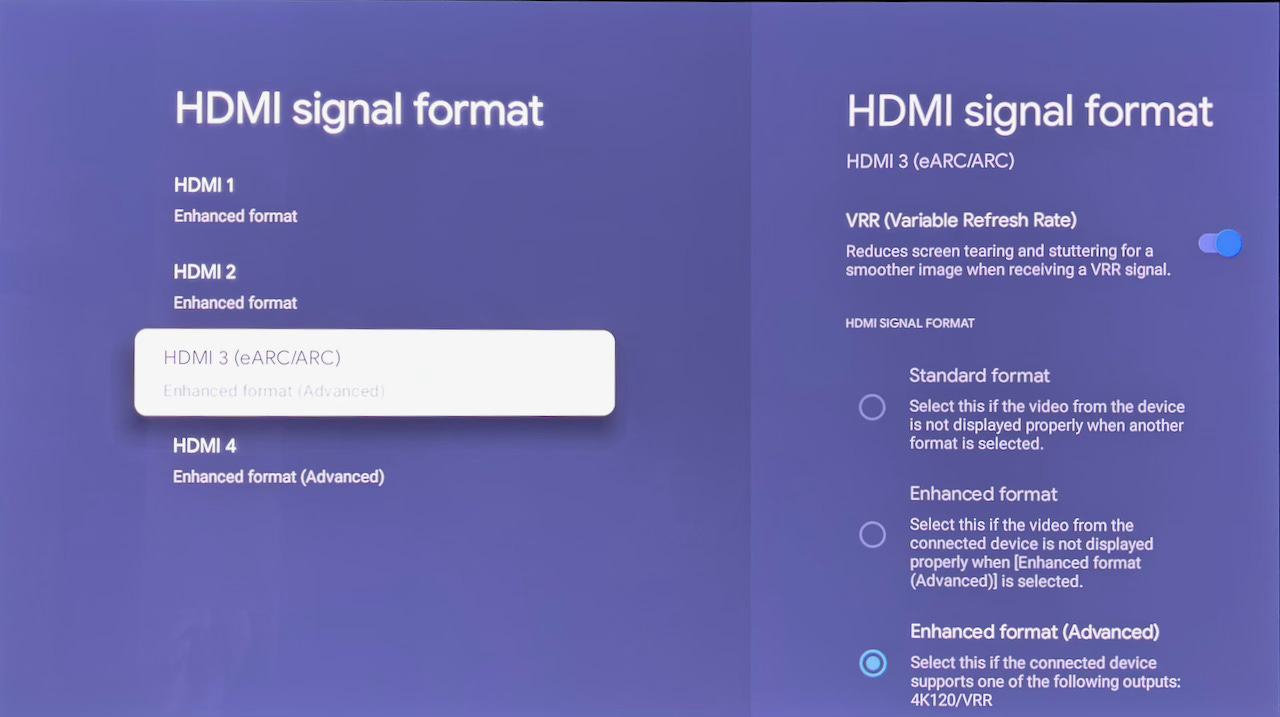
‣ Press ⛯ > All settings > Channels & Inputs > External inputs > HDMI signal format/VRR, and configure ports 3 and 4 as follows2.
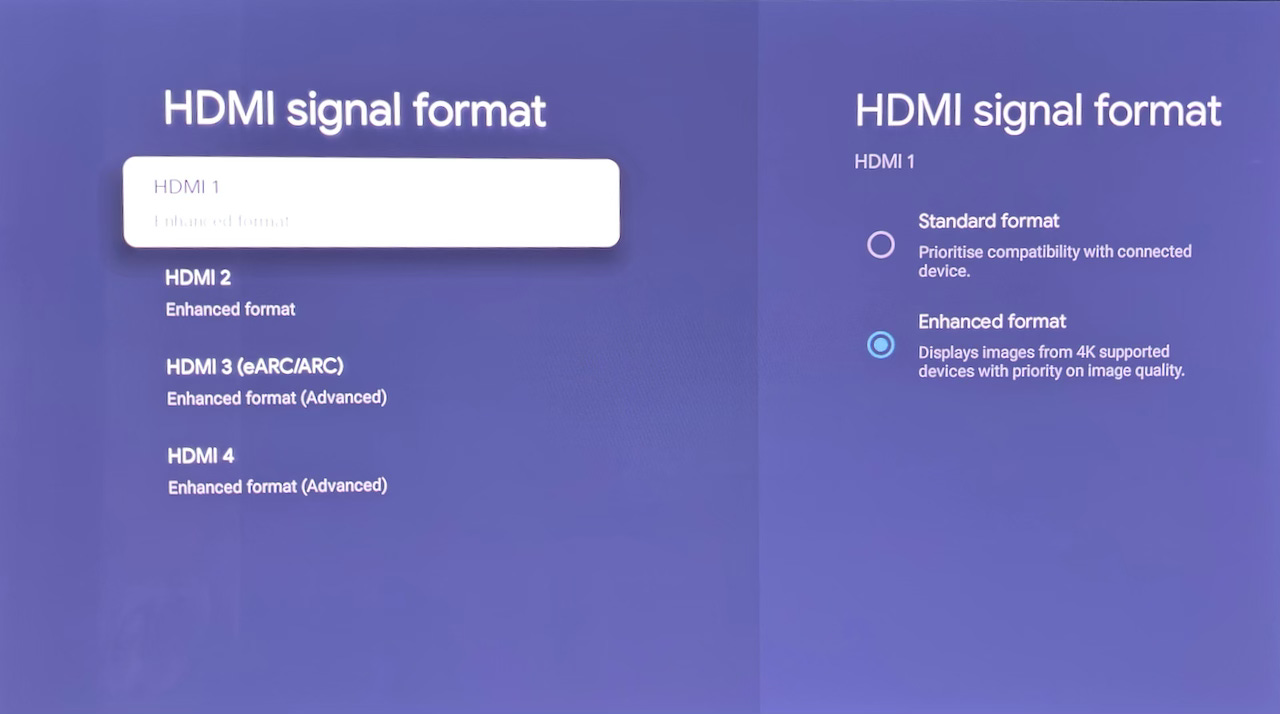
Configure ports 1 and 2 as follows:
‣ Set Reality creation: off
‣ Set Smooth gradation: off
‣ Set Noise reduction (both Random and Digital): off
‣ Set Peak luminance (SDR): max.
‣ In the Eco Dashboard:
Set Idle TV Power Off: 2 hours3.
Set Power saving (auto-adjust brightness to reduce power): off4.
Set Auto adjust picture according to ambient light: off5.
‣ Choose Content type: Video/Images as a default. Use PC when you want to use it as an external monitor, say for a Zoom call6.
‣ When in Video/Images, you have a sub-setting, Picture mode.
Set this to Professional, most of the time, for accurate color reproduction. HDR in this mode is out of the world, way better than anything I saw on the 16-inch Mini-LED Macbook Pro with 1600 nits peak brightness. A star field looks like I’m looking at it in real life, not on a screen. The Professional mode is what you should use to get what the Sony is capable of, and if you’re not going to benefit from it, why even buy such a costly TV?
Unfortunately, Professional is dim in daytime, so when watching a video where cinematography is irrelevant, like a tutorial on driving, set Picture mode: Vivid. It grossly distorts colors, so don’t use this picture mode for videos where the beauty of the video matters, like a nature documentary.
On the other hand, Picture mode: Calm reduces saturation and contrast, which makes it suitable to wind down before bed7.
Don’t use the Cinema or Standard picture modes, which reduce contrast, saturation and brightness.
‣ In Picture settings:
‣ Adjust the brightness based on the light levels outside. I typically use Max or Min. The dynamic range of the brightness adjustment is low. In other words, Max is not bright enough in day, and Min is too bright at night. Unlike the Macbook, which can get dim at night.
Audio Settings
‣ Turn on DTS Dynamic range10.
‣ Turn on Audio system prioritisation11.
‣ Set A/V sync to Auto12.
‣ Set Digital audio output to PCM13.
‣ Set eARC setting to Auto14.
‣ Set Optical digital audio output volume to Max15.
‣ When using a stereo receiver, specifically the Denon DRA-800H, I found the following settings to work best:
I’ve set the Dolby AC-4 Dialogue level to Max16.
Turn off Acoustic Center Sync17.
These HDMI CEC features work for my equipment.
‣ Coming to the built-in speakers:
Turn on Advanced auto volume18.
Set Post-processing to Dolby Audio processing19.
Set Dialogue enhancer to 2. It makes voices clearer20.
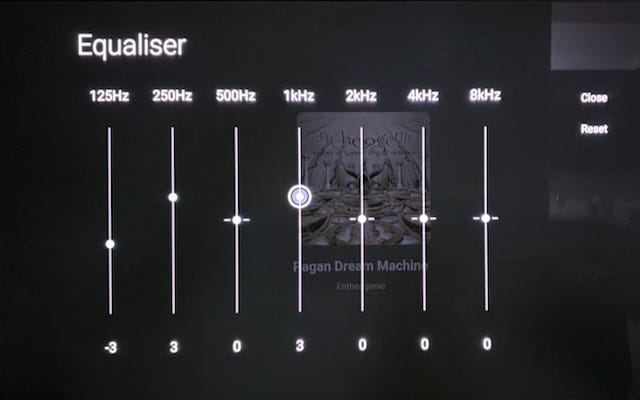
Set the Equaliser21 to:
Set Surround to Off22.
Playing video from your laptop
To play movies or TV series stored as files on your laptop, plug the laptop in via HDMI port 3 or 423.
Configure your Mac as follows:24
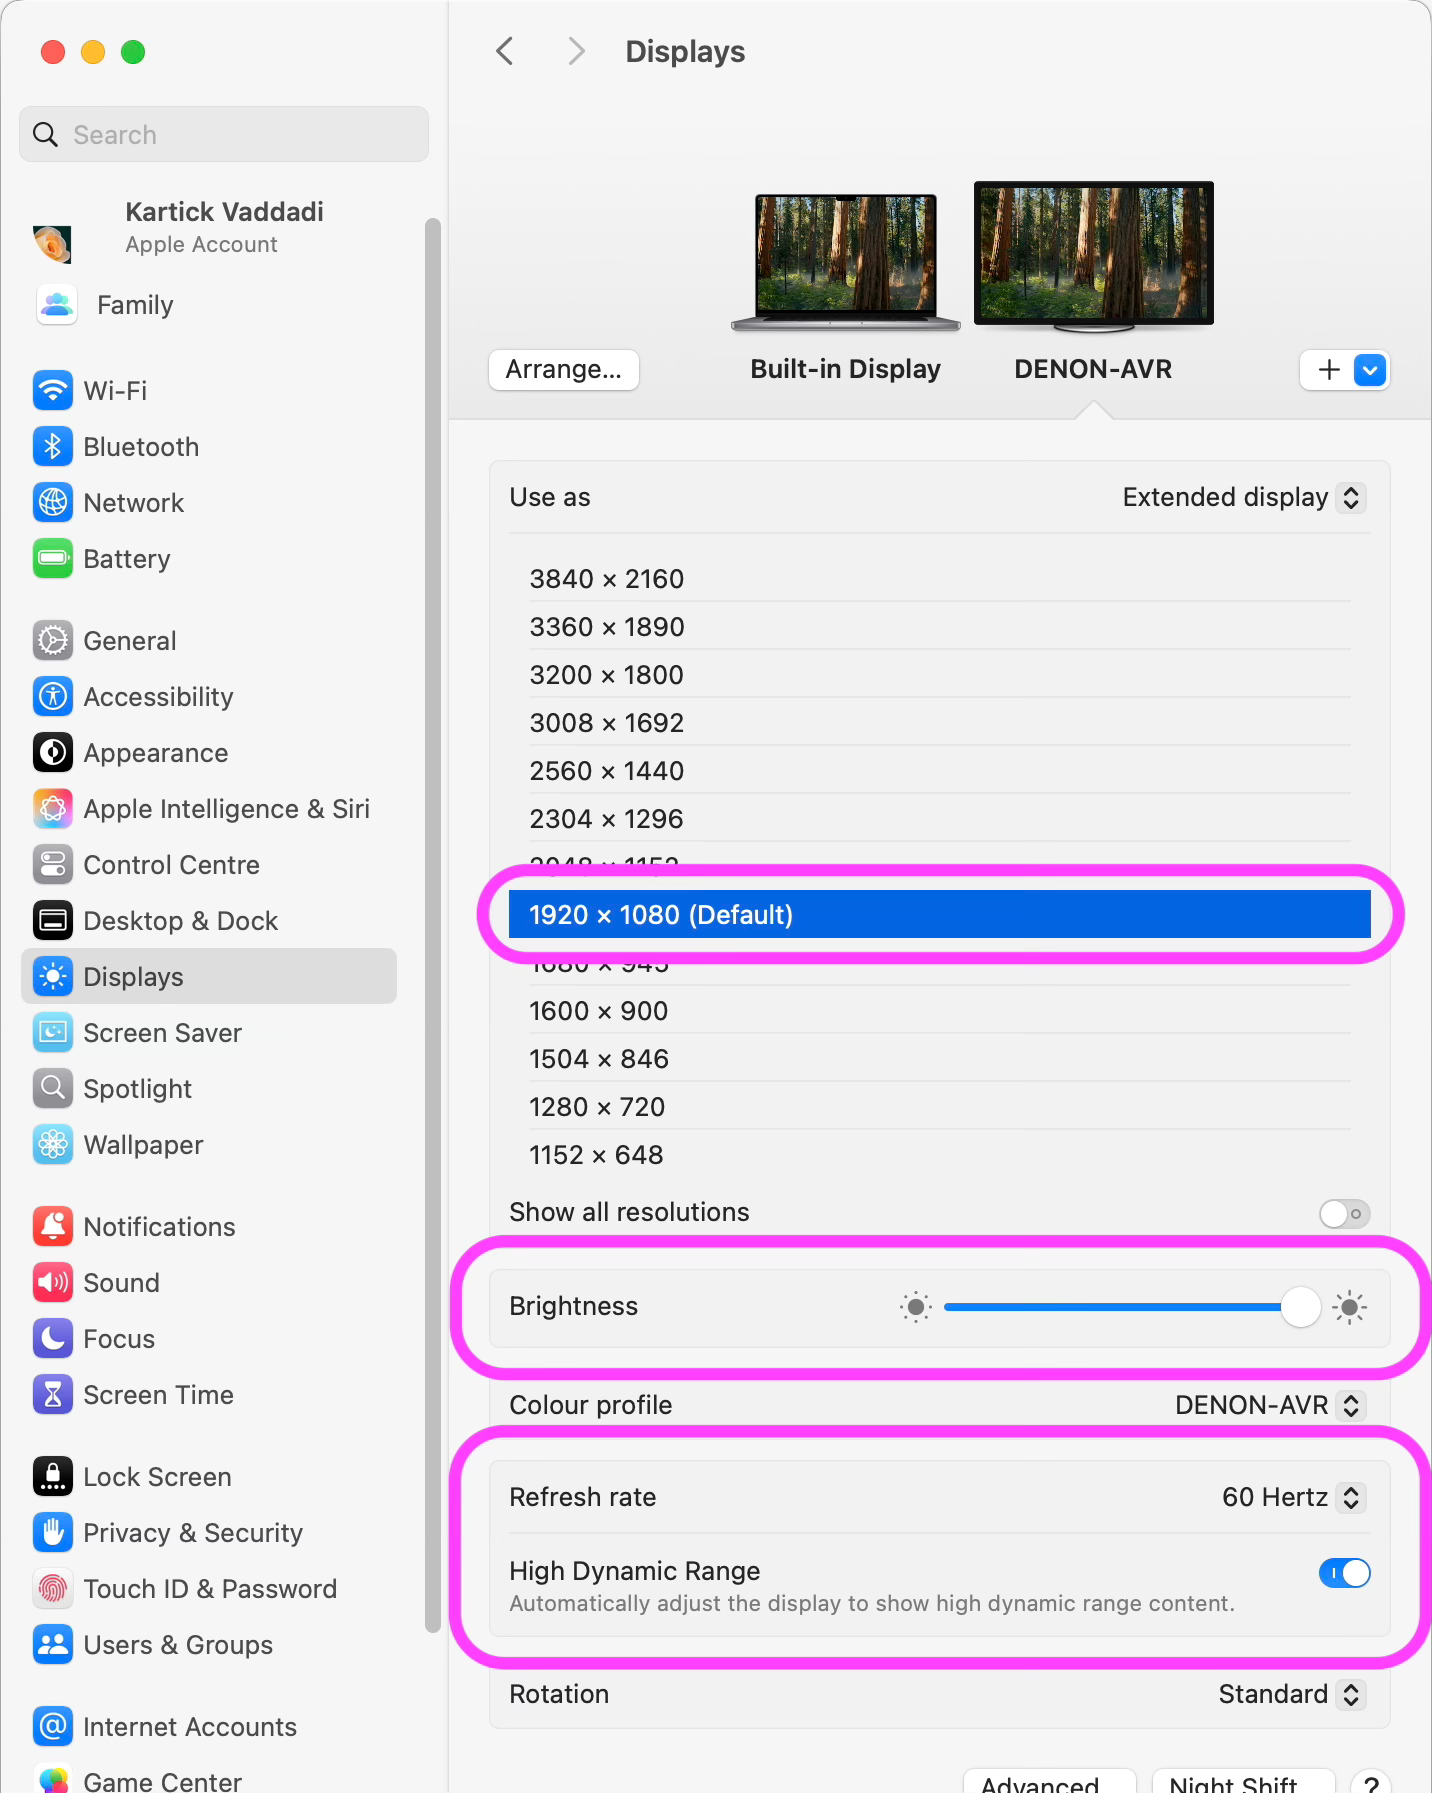
In System Information, verify that the Mac is outputting 3840 x 216025:
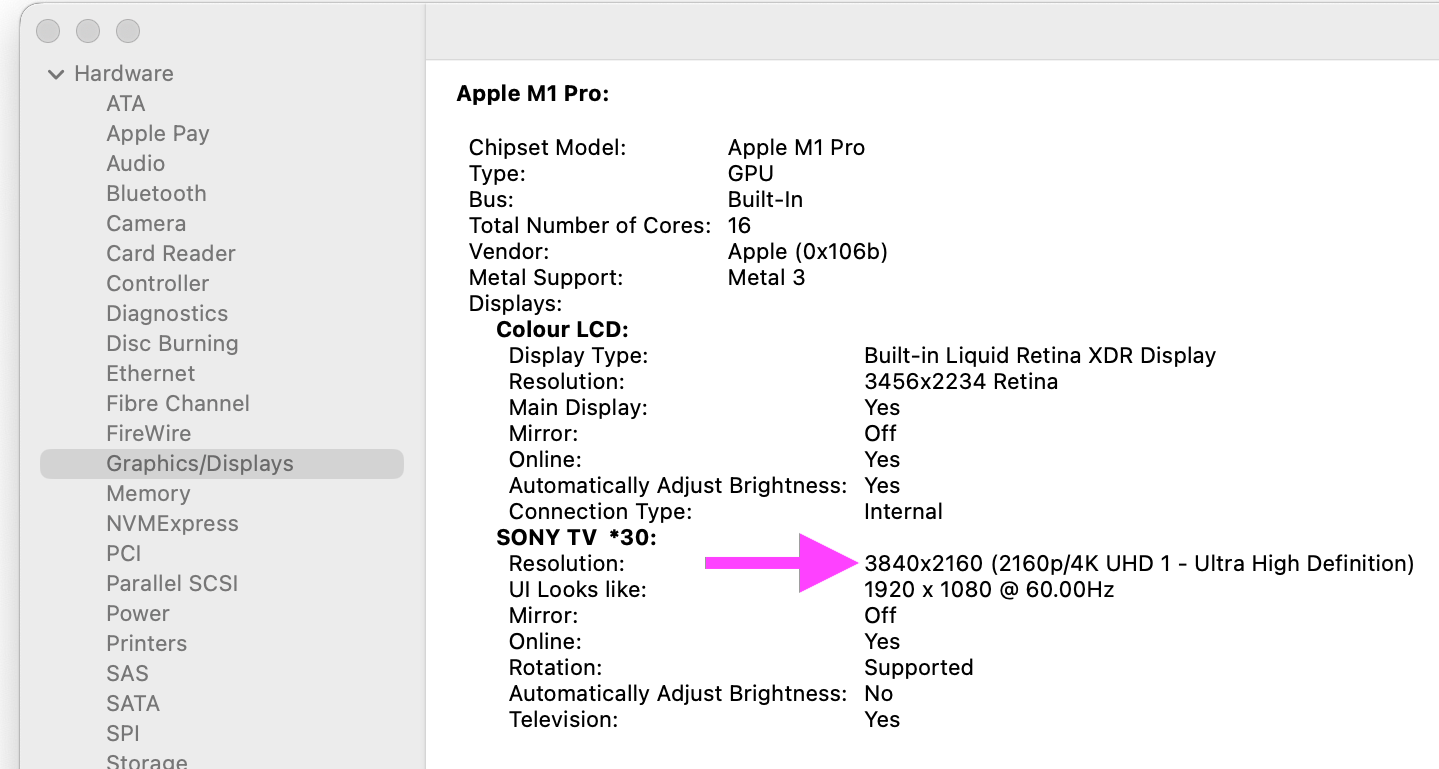
The resolution shown here is more important the the one in System Settings26. Change the latter till the former shows 3840 x 2160.
On the remote, press MENU, and then select Detailed signal info, and verify that it shows as follows:27

Watching Youtube
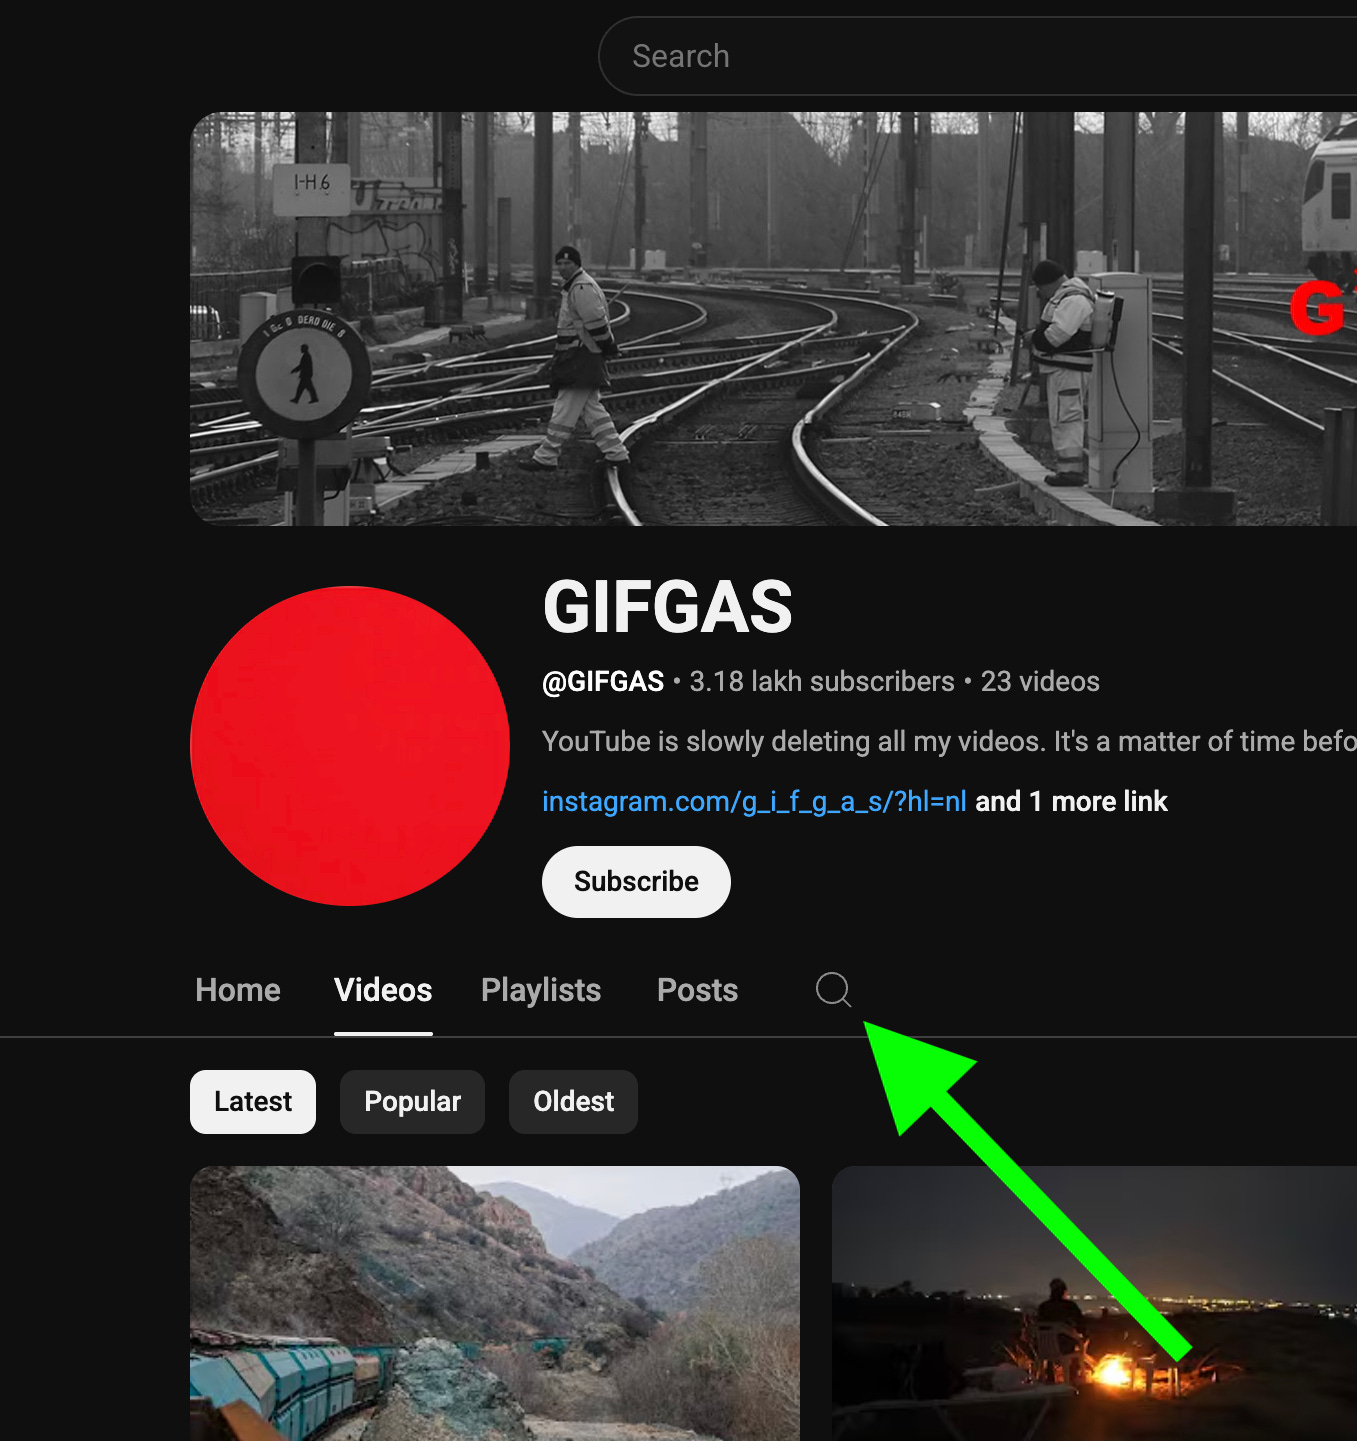
The most powerful way to watch Youtube is on your laptop, connected via HDMI as described above. That’s the only way you can search within a channel:
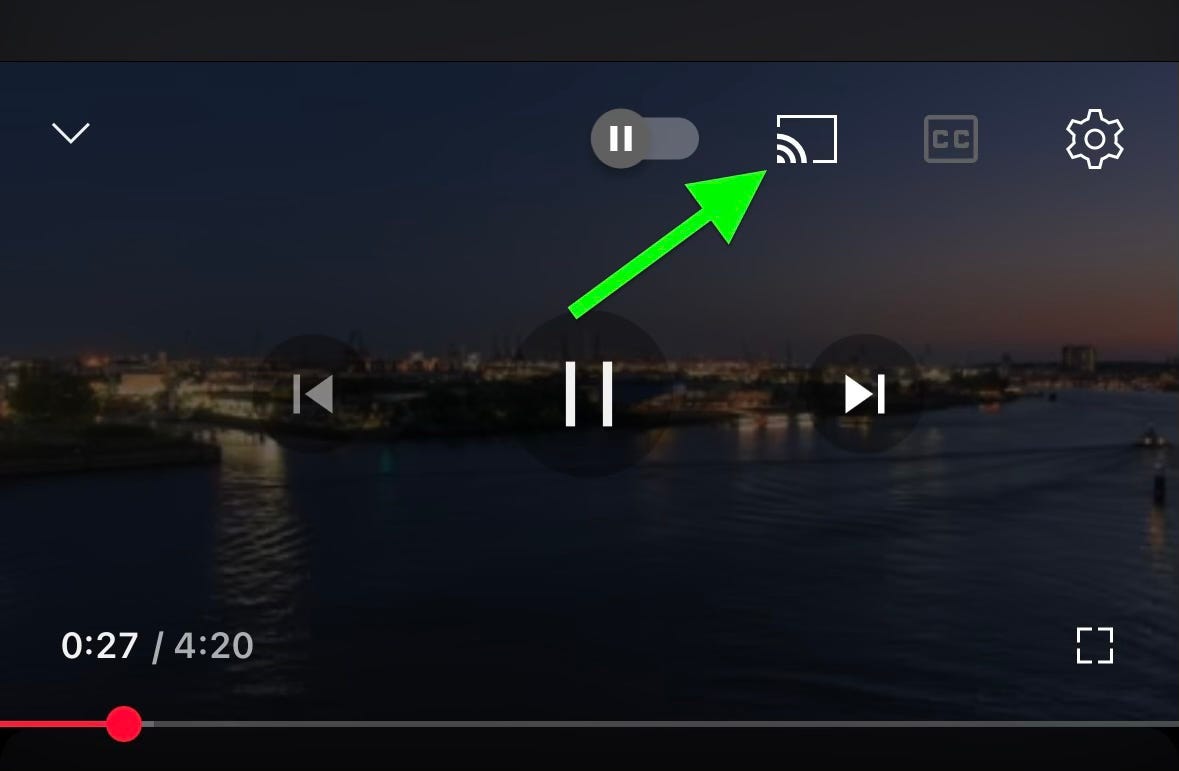
If you don’t need that, the most seamless way is to link your phone with the TV by clicking the share icon on your phone:28
… and then selecting TV or Youtube on TV29:
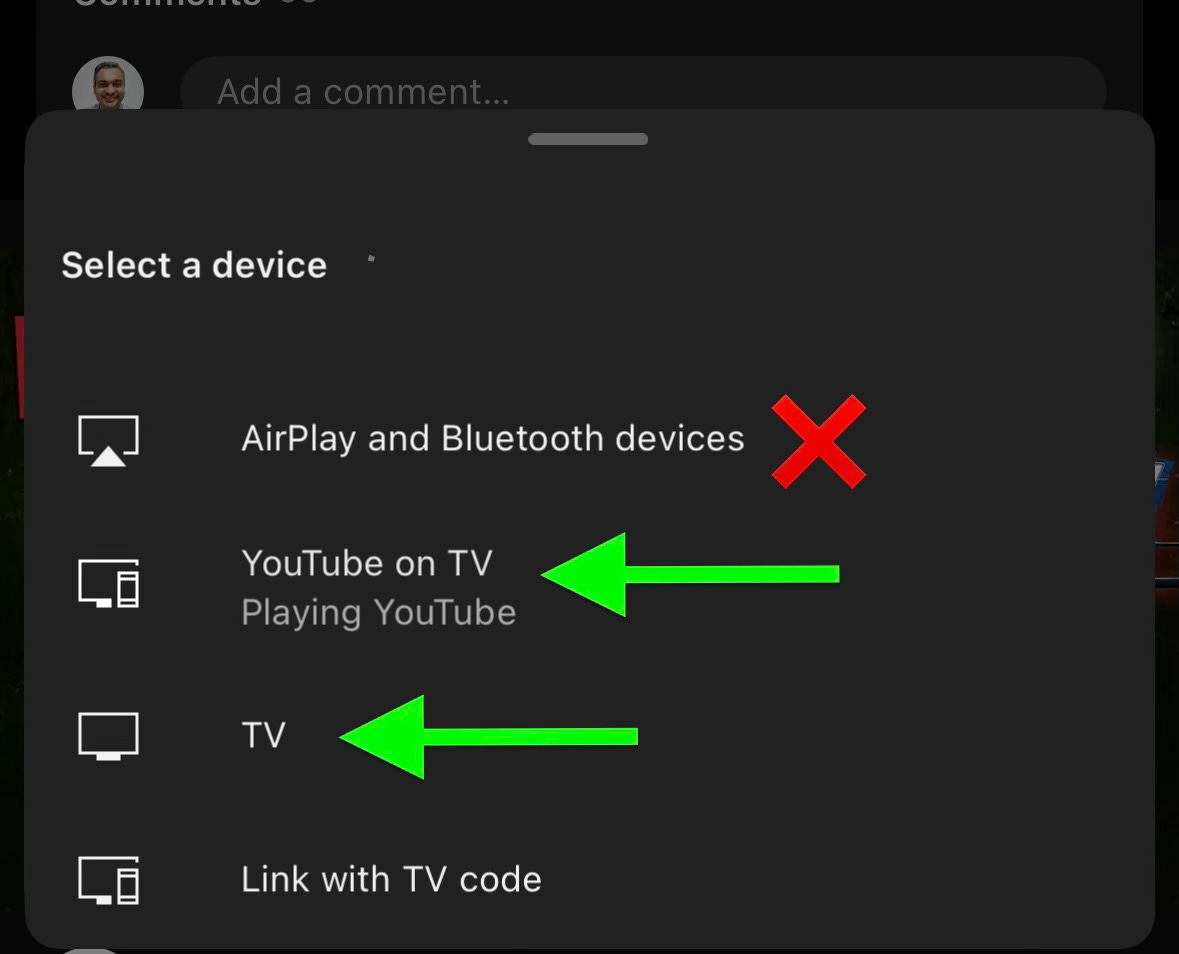
Then you can search on your phone, where typing is much easier than on the TV. The TV does have voice search but it’s nowhere as reliable as typing on the phone. Besides, on the phone, you can apply filters like duration, HDR, and whether the video was posted in the last year, month or day.
Features that don’t work well
The A95L has a lot of features that don’t work well:
You could use as a monitor over HDMI30, but it doesn’t work well — it’s too far, and you have to reduce the resolution to make it work well, at which point you have less space than a 27-inch UltraHD monitor. Then the ergonomics of a sofa are good for chilling but poor compared to a monitor, keyboard and computer for working actively.
You could install a HDR video player app on the TV and play videos from a USB 3 external hard drive or network share, but Google TV lacks a good HDR player app.
The TV lets you pair Bluetooth headphones, but don’t do it — it has little range, and the audio keeps cutting out even when it’s connected.
The TV supports Google Assistant, and it’s always on, responding even when the TV is turned off, but it’s unreliable to the point where it’s more trouble than it’s worth.
I have a lot of content on OneDrive, so I thought I could install the OneDrive app on the TV to play directly, but the OneDrive app doesn’t support the TV. Neither does Google Drive.
Coming to audio streaming services, Apple Music, Apple Music Classical and Spotify don’t support the TV. Youtube does, of course.
I thought I could install Teams or Zoom on the TV to attend video calls, but they don’t support the TV. Google Meet does, but I didn’t get a chance to test it out.
The Ethernet port on the TV is limited to 100 mbps, but that’s enough for Youtube, and a wired 100 mbps connection is faster and more consistent than 2.4 Ghz wifi, which sometimes dropped to as low as 3 mbps. The TV couldn’t connect to my 5 Ghz Wifi.
The TV comes with a streaming service, Sony Pictures Core, that streams at up to 80 mbps, which is higher than any other service. Some movies were included with my purchase. But to stream at 80 mbps requires a 115 mbps connection. While my Internet connection is 400 mbps, the TV is a bottleneck, so I need to buy a USB-A to Gigabit Ethernet adapter.
The TV comes with a webcam called the Bravia Cam.
I thought I could attend video calls using the webcam, so I tried to install the Teams, Zoom and Meet Android apps on the TV, but they don’t support the TV. The TV runs Android TV, so you install apps using the Play Store. The developers of an Android app choose which versions to make it compatible with — phone, tablet, Chromebooks, Wear and TV, and users can install it on those devices. Unfortunately, most app developers haven’t chosen to make their app compatible with Android TV.
Beyond videoconferencing, Bravia Cam also enables other features, but these are gimmicks. For example, Gesture Control accidentally triggers when I stretch. Another feature is turning it off when nobody is in front of the TV (“Auto power saving mode”), but I sometimes play a Youtube video and walk around the room listening to it, at which point it turns off.
The Bravia Cam enables another Auto adjust according to viewing position which didn’t seem to help.
The bottom line is that the Bravia Cam is useless. It’s a bunch of experiments done by Sony engineers, none of which work. Sony shipped this junk because they could, not because they should.
If you configure a port to standard, it won’t support HDR, wide color gamut or 4:2:2 (only 4:2:0). I also want to enable VRR since my Mac supports it.
Less, and it goes off in the middle of a movie.
It produces a dim picture. BTW, this setting is not to be confused with “Auto power saving mode”, which requires the Bravia Cam.
It messes with the color balance.
When playing back a movie, TV series or documentary from your Mac over HDMI, you should still use Video/Images, since you’re watching a video.
When you’re using it as an external monitor, use PC, since Video/Images lags, to the extent that you can’t use the mouse productively.
Though, arguably, not watching TV at all is better.
When viewing a space scene, it makes space look black instead of dark grey.
Otherwise, the image is dark.
I’m yet to test this out, but it should make it easier to hear even when the volume is lowered, if you’re using DTS audio that contains dynamic range metadata.
This will cause your TV to send audio to the receiver when it’s connected, and use its internal speakers when not. This is what I want, and it works, so I keep it on.
When I turned this off while using a Bluetooth speaker (specifically the Bose Portable Smart Speaker), the audio and video got out of sync.
Otherwise, the sound doesn’t play when using the Youtube app on the TV. Why? Because Youtube uses Opus, which the TV passes through to the receiver, but my receiver doesn’t support Opus, calling it an unknown format. So the sound doesn’t play at all. When I select Digital audio output to PCM, the TV decodes the Opus and sends the uncompressed audio to the receiver. Another reason to select PCM is that my receiver doesn’t support multichannel audio (not even downmixing it to stereo), so again you won’t hear any sound at all if the content you’re consuming uses multichannel audio.
Otherwise, the volume will be low even if you increase it on the receiver. Despite Optical in its name, it applies to HDMI, too.
I haven’t tested this, but this makes dialogues easier to understand when playing content encoded with a codec called Dolby AC-4, which doesn’t seem to be common.
I don’t think this applies to my set up, since I have a stereo receiver, which has no center channel. But if you do have a multichannel receiver, and you connect an additional cable, you can use this.
I haven’t tested this, but it keeps the volume level consistent for all input sources.
The alternative, Standard, makes voices sound less clear, too bassy, and unnatural.
You can alternatively set it to Max, which is 6, which makes voices even clearer, but it also makes voices sibilant, which means the “s” sound is exaggerated and unnatural. For example, “snake” sounds like “ssssssnake”.
Here’s the effect each of the qualisers has:
The speakers are too boomy, and turning down 125 Hz fixes that. If you reduce it further, the audio loses strength.
Boosting 250 Hz gives music strength.
Boosting 1 kHz makes the sound open up and be bright, rather than muted and slightly unclear.
These settings work great for music and spoken content.
If you want to optimise it for videos (TV shows, movies, documentaries), max out 125 Hz. With this, in an action scene, as things were heating up and the music rose, it felt exciting.
On makes voices sound slightly boomy and resounding, and slightly reduces sound quality.
These support better quality video than ports 1 and 2. If you have a receiver, connect that to port 3 and your laptop to the receiver. If you don’t have a receiver, connect your laptop to port 4.
Otherwise, the picture will be dim even when the TV brightness is maxed out. This is because the Mac is scaling down pixel values before outputting them.
To match the TV’s physical resolution. Otherwise, it will have to be scaled, hurting quality.
This is different how your adjust a display’s scaling in macOS — you choose which ever resolution balances readability of text with available screen space. But for a TV, since you’re not reading text, and you’re not arranging windows on it, neither of these considerations apply. Just run it at its native resolution to maximise quality.
The Mac uses a confusing system of 2x Retina scaling, where if you select 1920 x 1080, it actually means 1920 virtual pixels each of which maps to 2 physical pixels. That’s why System Information is the ultimate source of truth.
The TV supports 120 Hz, but my laptop doesn’t. If your source device does, then you should ensure that you see 120 Hz here.
The HDMI cable could also be the bottleneck. Mine was — it didn’t support all the features of the TV — UHD at 60 FPS with HDR and 4:2:2 chroma subsampling. So I bought this cable, which supports all the above plus 48 Gbps bandwidth, Ethernet, eARC and 8K at 60 FPS.
If you’re routing through a receiver, then the receiver (and the second HDMI cable in the chain) can also become bottlenecks. Mine was misconfigured — it was set to standard rather than enhanced mode. So I fixed it. But some limitations can’t be fixed. For example, mine doesn’t support VRR, which both my TV and my laptop do. Luckily, I don’t play games. If this was important to me, I’d have to bypass the receiver and connect the gaming device directly to the TV.
An easy way to debug this is to first bypass the receiver and connect your sources to your TV’s 3rd or 4th HDMI port. Verify that you’re getting optimal settings for each of the sources — the lower of what the TV and the source support. Note down the settings for each of your sources. Then connect each of them via the receiver and check that you’re still getting the same settings. In other words, a Mac via the receiver should have the same Detailed signal information as the Mac connected directly. An Xbox connected via the receiver should have the same Detailed signal information as the Xbox connected directly.
Not on the desktop. When playing a Youtube video in Chrome on the Mac, if your TV is on, a Cast icon shows up:

Unlike the Youtube mobile app, which turns on the TV when you share to it, Youtube on the desktop requires you to turn the TV on manually, or this icon doesn’t appear. Even if you turn the TV on, it doesn’t always appear. Even when it appears, it doesn’t work reliably: it keeps hanging, the seek bar doesn’t work, or it plays in 720p SDR.
In addition to Youtube’s Cast button, Chrome has a Cast menu item:

When you select this, you can choose to Cast the current tab or the entire screen:
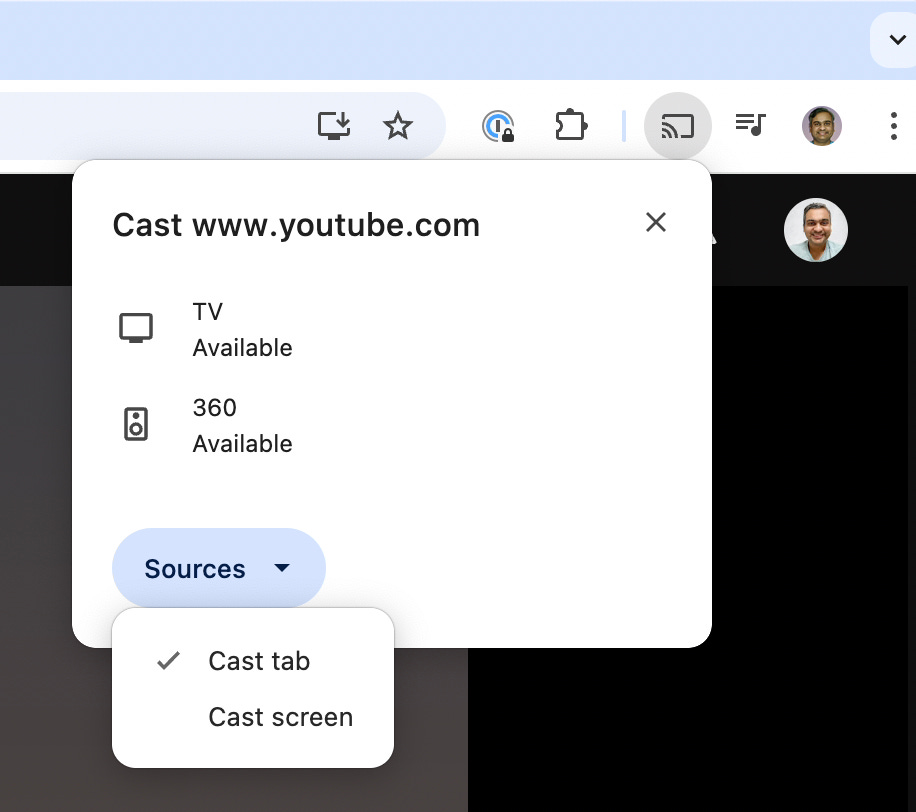
Both work poorly:
“Cast tab” keeps hanging for multiple seconds, the sound plays on both the Mac and TV speakers, and the video shows a different frame on the Mac as opposed to the TV. If you refresh, the UX changes… It’s a broken UX.
“Cast screen” is lower quality than the Mac’s screen mirroring (720p?) and the dynamic range is terrible. Note that the macOS screen mirroring is itself worse than HDMI.
They do the same thing.
Why do I recommend against AirPlay? Because it’s a far worse user experience: it’s blurrier. I tried twice and it was blurry both times, whereas selecting “TV” in the share menu resulted in crisp playback both times. It turns out that AirPlay played once at 1440p and the other time at 480p (!) while “TV” played at 2160p both times. AirPlay doesn’t let you fix the problem by manually switching to a higher resolution: the resolution chooser is disabled. “TV” lets you manually increase the resolution in case the default wasn’t right. Even if it did play in UHD, it would be worse because the video is getting recompressed on the iPhone before sent to the TV, whereas “TV” has the TV directly fetch the video from Youtube servers without the phone as a middleman, which will always be better.
If your phone runs out of power or is rebooted or taken out of range or the Youtube app on the phone has a bug and you want to restart it, AirPlay stops, while “TV” continues playing.
Seeking is stuttery on AirPlay and smooth on “TV”, which also shows an overlay thumbnail showing the video content at that time, so you can release the seek where you want it to.
Considering all these factors, don’t use AirPlay in order to watch Youtube on your TV.
You can use macOS’s Screen Mirroring to use your TV as a wireless display for your computer:

This is limited to SDR and 1080p, and the video is slightly choppy and laggy, as wireless connections always are, but it’s good enough for office use when you prioritise convenience over quality. But the problems I mentioned with HDMI remain. If anything Screen Mirroring is a worse HDMI.